

How To Repair A Jet Ski Hull

Jet Ski's are made with lightweight fiberglass hulls. This is why they tin fly through the air off of wakes and can provide the speed and maneuverability of a motorcycle on water. However, the fiberglass hull is can crack or intermission easily shall you come in contact with another object such as a log, dock, or beach. Even if you lot are a careful passenger, high impact areas that go a lot of apply can go scratched and also course holes. A large or even pocket-size pigsty in the hull of the jet ski tin can cause damage to the internal components of the jetski and scratches only don't wait very skillful. Luckily, at that place are tricks and tips on how to repair any harm to a jet ski hull.
How do y'all repair a jet ski hull? Repairing a jet ski hull is possible at home as a DIY past sanding effectually the hole, placing layers fiberglass mat, and and then hardening fiberglass resin around the mat. Even large holes can exist taken intendance of with but a moderate amount of attempt. All of these products are bachelor at your local hardware store.
Materials Y'all Will Need:
- Rough & Fine Sandpaper
- Fiber Glass Mat
- Fiber Glass Resin and Hardener
- A loving cup for mixing with a stick
- Some cheap paintbrushes (you lot will throw these away)
- Acetone Remover
- Rubber Gloves
- Scissors
- Epoxy Primer
- Gel Glaze
- ii fine paintbrushes
- Personal Protection Equipment (respirator, masks, safety glasses, etc.)
The Steps To Repair A Minor Hole In A Jet Ski Hull
Small holes in jetskis are fixed in much the same way big holes or cracks are fixed. The following section details the steps you will need to take for a small hole in your jet ski hull, just these steps can also be followed for a large hole or a fissure. For fixing a crevice in a jet ski hull, see the additional steps downward below.
Brand sure yous have all of your materials before you start work. Also, keep in mind that fiberglass resin tin can come in different types (Epoxy, Vinylester, Polyester). We recommend the epoxy type of fiberglass resin considering it is the strongest and is made to bond well with fiberglass.
Stride ane: Cleaning & Sanding Around The Hole
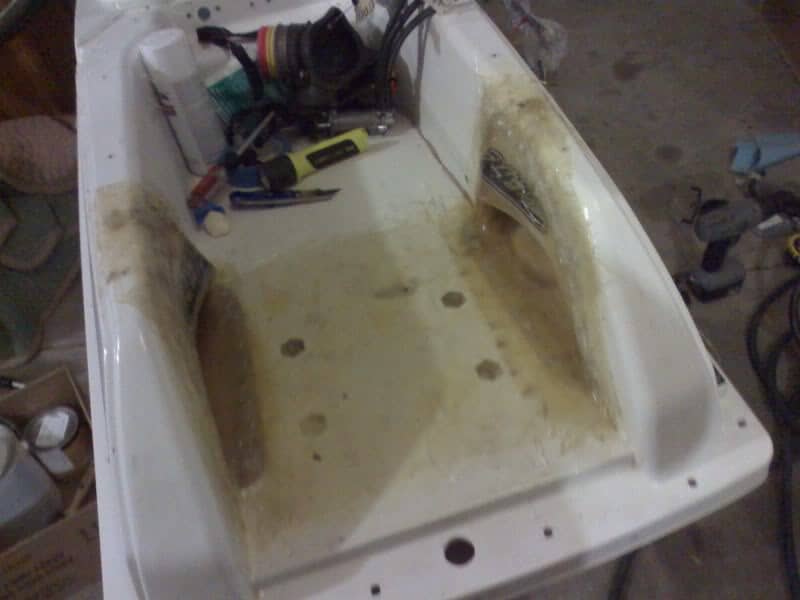
The hull of the jetski is made of polyester fiberglass or a SMC (sheet molding compound). If punctured or damaged in any way, the gristly material of the hull tin can grow and attach contaminants. These areas demand to be cleaned kickoff and so that they are non pressed or ground into the hull.
Apply soapy water than a degreaser like Super Orangish to clean around the hole. This will clean abroad any debris or dust that peradventure there and sterilize the contaminants possibly left behind.
Use the rough sandpaper first so the fine sandpaper to sand both sides of the hull. Go the surface nice and smooth so that the bond volition be clean with the resin. Dry the surface then wipe make clean with Acetone and a rag to wipe around the hole. Cleaning around the hole will too give the epoxy resin a better concord with the bonding agent of the adhesive.
Footstep 2: Cut The Fiberglass Mat For The Behind Of The Hole
Using the scissors, cut a slice of fiberglass mat that covers the backside of the hole. Make sure that the fiberglass mat is big enough to extend at least an inch around the hole. Later you have cut out the correct size piece of mat, cut out multiple pieces of fiberglass mats for your layers.
Step three: Mix The Resin & Hardener Together
Put on the safe gloves because the resin is extremely viscous. Using the cup and stick, mix the resin and the resin hardener together. Your resin will have instructions on the packaging with detailed instructions on how to do this. Make sure to follow the instructions carefully! Use the stick to mix the resin and hardener together. Keep in mind that the resin is now activated and will only be prepare to exist applied for a short amount of fourth dimension, so get to work repairing the pigsty! Merely mix the corporeality of resin y'all demand to repair as it will become difficult every bit yous are working and it is better to work with fresh fabric.
Step 4: Apply Resin To The Hole
Employ the paintbrush and utilise resin directly on to the surface of the hole. Once you lot have evenly coated the surface surrounding the hole, identify one sheet of the mat on the hole. And then, evenly glaze more resin over the surface of the mat.
Step 5: Resin Mat Layers
After coating the start layer with resin, the second mat layer can exist placed on top of information technology. Coat this layer with an fifty-fifty corporeality of resin, just like before. Go along this process for as many layers as y'all desire to exercise.
Pace 6: Allow Resin To Dry
After you take added, your mat resin layers allow them to dry. The proper amount of time needed for the resin to dry should exist listed on the back of the resin container. E'er experience the stiffness of the resin to make sure that information technology is done hardening.
Step 7: Measure The Size Of The Front Of The Hole
Utilise a permanent marker and trace around the hole. And so, cutting the fiberglass mat layers into the same shape of your outline around the pigsty. This footstep is crucial because you lot want your front side(the visible side) to be flush with the residual of the hull. The outline in permanent marker helps yous to cut verbal pieces of fiberglass mat for your layers.
Step 8: Apply The Resin & Mat Layers To The Front end Of The Hole
Mix up the resin again in the cup with your stick. Identify a small-scale corporeality of resin into the pigsty. Then, place the mat into the hole. Once the start mat layer is placed inside the pigsty, glaze it evenly with resin. Continue the process with the rest of the layers. Allow the resin dry out for the right corporeality of time and test it for hardness with your finger to come across when it is done hardening.
Footstep 9: Sand Down The Hardened Resin
Once the resin hardens on the outside, smooth out the surface of the patched hole with sandpaper. Again, start with the rough sandpaper then use the fine sandpaper. When yous are washed with the sanding of the hardened resin the patch should be seamless with the residue of the hull.
Make sure to test the integrity of the patchwork and the hardened resin past gently pressing with your finger.
Stride 10: Apply Epoxy Primer and Gel Coat
One the patch is washed with the layers of fiberglass mats and resin are done on each side and have been sanded down to sit seamlessly on the hull, use the fine paintbrush to apply a few coats of epoxy primer. They come in most colors, so try to discover one that matches the paint job on your jet ski.
Later the epoxy primer layer is dry, you lot can use several gel coats. Make sure to use evenly over the patched pigsty. Also, remember that the bulbous repair spot does not have to be painted or gel-coated on the inside.
How Do You Repair A Large Pigsty In A Jet Ski Hull?
You can follow the same steps as above for a more than massive hole on the hull of a jet ski. Yous may want to consider more than layers of the fiberglass mat to give the patch actress durability. Make sure that each layer is hardened earlier applying the side by side i. Also, examination the final patch for strength with your finger.
How Can You Repair A Crevice In A Jet Ski Hull?
Fixing a cleft in the hull of your jet ski requires resin(epoxy) to be hardened in layers over the cleft, with the fiberglass mats. The steps are similar to repairing a hole in the hull of a jet ski. If the crack does not go all of the way through the hull and is more of a deep scratch, you tin merely fill the hull with resin and it will patch the scratch.
Materials Y'all Will Need:
The same materials needed to set up a hole in the hull of a jet ski are used for fixing a crack. You will also need a tool to grind out the wall of the hull around the crevice. The best fix is to grind it down and so make full in the valley left from the grinding with flayers of fiberglass mat and hardened epoxy resin. The difference betwixt the ii repairs is that a cleft is a one-side repair, whereas you repair both sides of the hull for a pigsty.
- Rough & Fine Sandpaper
- Fiber Glass Mat
- Fiber Glass Resin and Hardener
- A cup for mixing with a stick
- A cheap paintbrush(you will throw this away)
- Acetone Remover
- Safety Gloves
- Pair of scissors
- Epoxy Primer
- Gel Coat
- 2 fine paintbrushes
The Steps To Repair A Crack In A Jet Ski Hull
Step 1: Clean The Surface of the Jet Ski
Using Crawly! or another degreasing product, scrub down the hull of the jet ski effectually the scissure. This volition loosen and remove the greasy contaminated water stain that can build upwardly in the scissure. Do this before grinding, so y'all don't grind contaminants into the plastic of the hull. Use the Acetone and a rag to wipe around the hole. This will clean abroad whatever debris or dust that maybe there. Cleaning around the pigsty volition give you a superior bond with the resin.
Step 2: Grind Down The Fissure
Use a grinder, grind out a valley downward the middle of the crack that goes through well-nigh to the top side of the hull. So utilize sandpaper from rough to fine to sand the bottom of the jet ski hull. Get the surface squeamish and smooth so that the bond volition be clean with the resin.
Pace 4: Cutting The Fiberglass Mat For The Backside Of The Hole
Outline the valley with a pen a half-inch out. Cutting a piece of fiberglass mat that covers as much of the valley as you tin can so it is sitting similar a 5-shape. Make sure that the mat is big enough to be pressed into the valley made by the grinder in the hull and extend at least a half-inch out to the pen marks. Subsequently you have cut out the right size slice of mat, cut out multiple pieces of fiberglass mats for your layers. You will need many layers.
Step 4: Mix The Resin & Hardener Together
This step is basically the same every bit the one above for a hole. You lot still want to use gloves and employ epoxy resin. There may be multiple layers of fiberglass mat needed, so you may need more resin products and a hardening agent for fixing a crack. Use the stick to mix the resin and hardener together. Go along in heed that the resin is now activated and will simply be set up to be applied for a brusk amount of time, so repair your fissure chop-chop!
Step 5: Utilize Resin To The Hole
Use the paintbrush and apply resin up and downwards the length of the cleft. If the length of the fissure is longer than one of your fiberglass mats, just apply the resin needed for 1 mat at a time. Brand an even coat of resin on the surface of the crack. Place one sheet of the mat on the pigsty so, evenly coat more resin over the surface of the mat.
Step half dozen: Resin Mat Layers
Since you are fixing from only one side with a crack, you will need many layers of resin and fiberglass mats to build up and hardened on top of each other. Since you take to grind downwardly the hull to match the cleft, you should get to at least that depth of the fiberglass mat layers, possibly more. Afterward coating the first layer with resin, the second mat layer can be placed on summit of information technology. Glaze this layer with an even amount of resin, just like earlier. Continue this process for as many layers as needed to make the valley flush with the hull.
Step 7: Allow Resin To Dry
After you lot have added your mat resin layers, allow them to dry. The proper amount of time needed for the resin to dry should be listed on the back of the resin container. Always feel the stiffness of the resin to make sure that it is washed hardening.
Step 8: Sand Downwards The Hardened Resin
Test the patch of dried resin and fiberglass patches with your finger. If the patch is stable, sand down the surface of the patch to make it smooth. Use rough sandpaper beginning and so fine. When yous are done with the sanding of the hardened resin, the patch should exist seamless with the rest of the hull.
How Do Y'all Fix Scratches On A Jet Ski Hull?
Scratches are common for jet skis. Some become unsightly or even risk the integrity of your hull. The rocks and sand that scratch up the bottom of your jet ski are no lucifer for sanding down the rough surface and repairing the hull and gel coat.
Materials You Will Need:
- Sandpaper (rough and fine)
- Epoxy Primer
- Gel Glaze Pigment
- 2 paintbrushes
The Steps To Fix Scratches On A Jet Ski Hull
Step 1: Sand Down The Scratch
Using the crude sandpaper first sand down any part of the scratch that is hanging off. Apply the fine sandpaper simply to smooth. The surface should remain pretty level. Sand an expanse larger than the scratches so that you can alloy in the gel coat.
Step 2: Appy The Epoxy Primer
Using a fine paintbrush, paint the naked hull of the jet ski an even, liberal coat of primer. The layer does non have to exist too thick. Call back, you still have the gel coat layer. Check the tin of primer for instructions on how long the epoxy primer volition need to dry.
Step 3: Utilise the Gel Coat Layer
Use another fine paintbrush to pigment several coats of the gel glaze. Once the Gel coat layers have hardened, add together some wax to the entire hull for a professional finish that will help to keep the gel coat from scratching.
Conclusion
There are 2 ways to set up the holes or cracks in a jetski hull: i-sided or two-sided. Two-sided is meliorate because yous are building upwardly strong layers of epoxy and fiberglass on each side of the harm. Yous only need to grind down halfway or not at all for two-sided repairs. Two-sided repairs, similar the one we detailed for a hole on a jet ski hull, does have more steps. A two-sided repair has to be done from both sides of the hull. It as well requires that you have the jet ski apart and prep both sides for the epoxy resin. However, fixing the jet ski hull from only one side requires grinding down a valley of the hull around the crevice. And then, a large number of fiberglass mats to fill in the valley left from the grinder while leaving some vulnerability to the opposite side of the repair. Even so, since the inner workings of the jet ski sit within the body of the hull, it is not always possible to fix the hull with a two-sided repair.
Fixing scratches on the hull of a jet ski besides deals with the final paint and clear coats of the hull. Epoxy paint and gel glaze tin be placed over the hole and crack fixes made with the epoxy resin and fiberglass mats. Epoxy primers come in most colors, and the gel coat adds that finish to highlight your work. It too helps to further protect the entire hull of the jet ski.
Source: https://www.watercraftlife.com/how-to-repair-a-jet-ski-hull/
0 Response to "How To Repair A Jet Ski Hull"
Post a Comment